Designer Toolbar and Handling Basic Shapes
The Process Maps Designer contains a great toolbar with different areas, standard drawing shapes and attribute options, e.g. example lines, fills, colors, text size, shadows.

- Left Menu (see Left Menu)
- Save and Configure (see Save and Configure)
- Redo / Undo
- Basic Elements
- Links
- Line, Fill, Shadow Format (see Lines, Fillings and Shadows)
- Font, Label Format
- Canvas Options (Hide Grid, Hide Shape Snaplines, Hide Command Icons)
- Advanced Features (Enable Command Icons, Insert or Remove Space, Edit Anchor)
- Access Online Documentation
Basic Elements
The simplest elements and shapes you can create with the Designer can be found in the middle of the upper toolbar. To create a shape, click its button with the left mouse button. Your cursor will then change to a cross. You can now create the shape by clicking and dragging on the canvas.
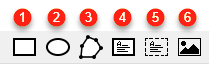
- Create a rectangle by dragging its size while holding down the left mouse button.
- Create circles or ellipses by dragging their size while holding down the left mouse button.
- Create polygons as free shapes by clicking the canvas once and dragging individual lines. Each click on the canvas creates a new line. End the creation by double-clicking with the left mouse button. By pressing
Escyou abort the creation of the polygon. - Create framed, white-filled text fields that can be used to hold objects, headings or annotations.
- Create transparent text fields that can be used to hold objects, as headings or for annotations.
- Insert images and graphics that you have saved directly in M-Files. Click the button and create the shape to hold the image by clicking and dragging. Then drag the image from the left Object menu onto the shape. (If you do not drag to the shape, the image will be saved to the canvas as an M-Files object).
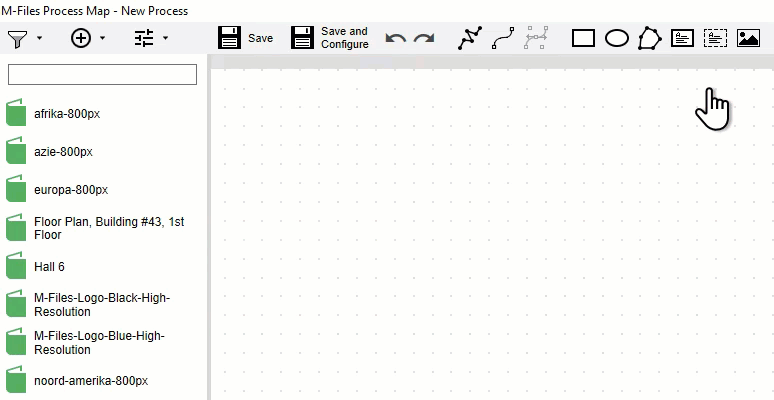
Above: When you drop an image file onto the canvas it does not automatically expand to a visual representation. It stays a rectangle. If you drag the file on to the previously created placehoder, the image is loaded.