Table of Contents
Manage the M-Files User Interface
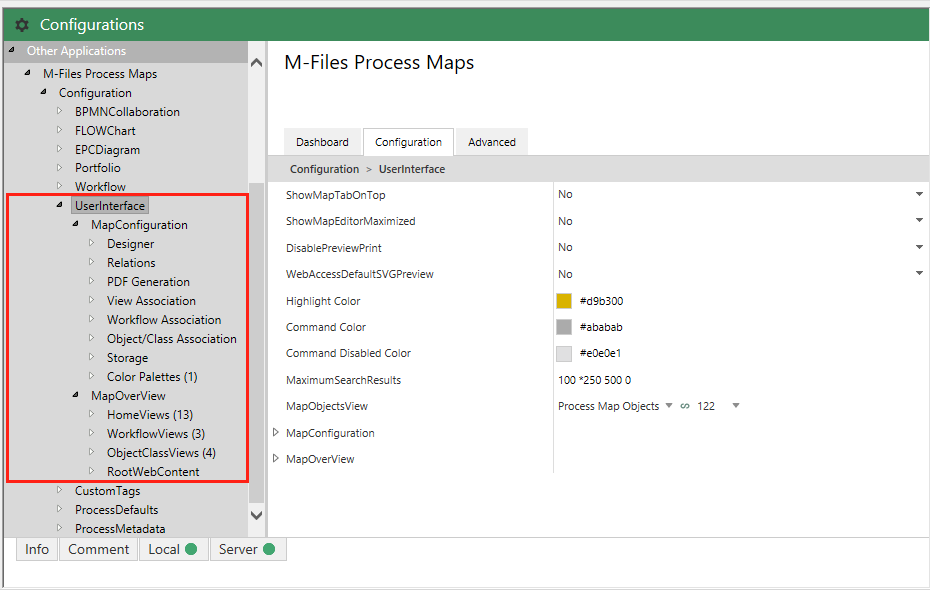
The UserInterface configuration entry, offers numerous settings for displaying, tabs and content in your M-Files Clients:
- General configuration settings for the user interface
- Configurations of the design environment
- Set the visibility of individual tabs of the Save and Configure dialog.
- Add tabs and content to views and home screens
- Dynamic display of tabs in WfTabs
- Displaying web content in the root of your document vault
User Interface Settings
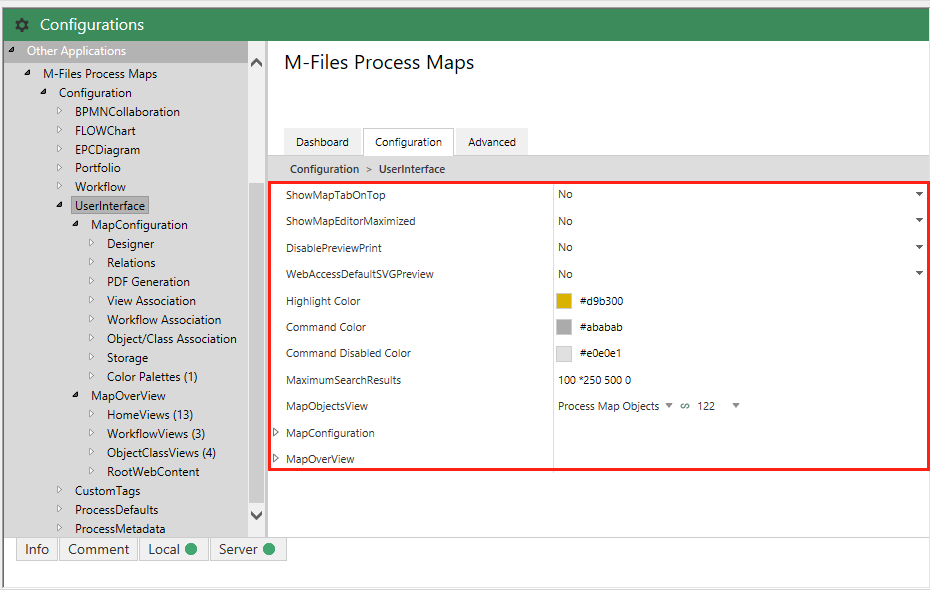
If you select the UserInterface node, the general settings for the user interface are displayed on the right-hand side:
- The ShowMapTabOnTop option determines whether the map preview should be called in the foreground of the M-Files client. This option must be activated if you want to display the corresponding workflow map directly when selecting a workflow object.
- The ShowMapEditorMaximized option sets if the Process Maps Designer tries to open in full-screen mode by default.
- The DisablePreviewPrint option allows you to deactivate the print function for the Map Preview by default.
- The WebAccessDefaultSVGPreview option allows setting the default display of the Map Preview in M-Files Web client to SVG, so that the maps are displayed faster.
- The Highlight Color option sets the default color in the Map Preview for marking elements and as highlight for command icons.
- The Command Color option sets the default color in the Map Preview for command icons when they are enabled and not selected.
- The Command Disabled Color sets the default color in the Map Preview for command icons when they are disabled.
- The MaximumSearchResults, defines the settings for the advanced search in the object menu of the Designer.
- The MapObjectsView option defines the view that contains all object types for display in the designer object menu.
MapConfiguration
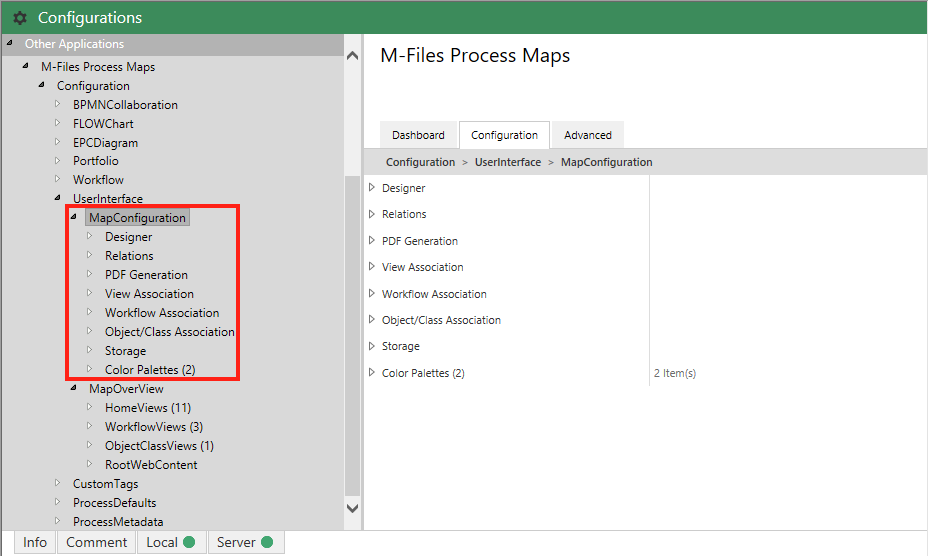
The MapConfiguration section is generally about the functions that should be available by default in the Process Maps Editor. You can also define which user groups have access to specific tabs of the Save and Configure dialog.
Designer
This section deals with basic settings that can be made to the design environment.
Please note that these settings, except for Edit Allowed For, are default settings that can be changed afterwards within the editor or via Save and Configure. Also, note that the settings made here are only applied to new process maps that were created after saving the settings.
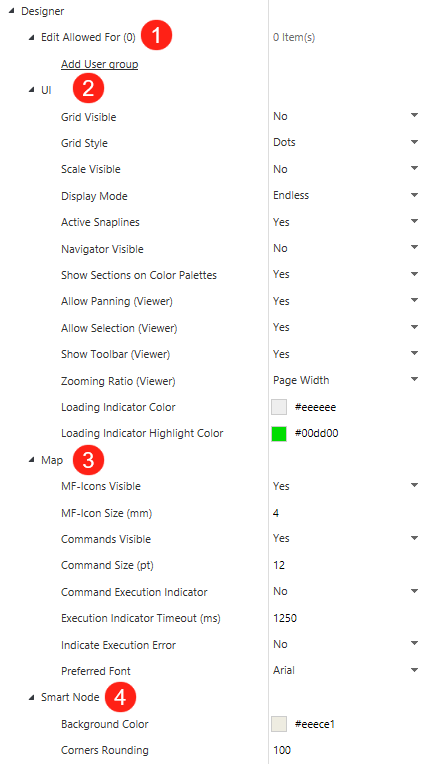
1. Edit Allowed For - Determine which user group is able to change those settings in the Save and Configure dialog of the editor. By default, all internal users can access this section.
- Add User group - You will encounter this feature more often in the Admin configuration. However, to avoid repetition, it will only be explained the first time. Here you can define which permissions individual user groups have during the creation of maps. If no user group is assigned, the default access rights are applied.
2. UI - Determine what the User Interface of the editor should look like. As mentioned above, these are default settings that can also be changed in the Designer tab of the Save and Configure dialog.
- Grid Visible - Determine whether a grid should be displayed within the editor.
- Grid Style - If you have selected
Yesin the previous point, you can configure the appearance of the grid here. You have the choice betweenGrid(=solid lines),Crosses(=small crosses that are not connected to each other), andDots(=dashed lines). - Scale Visible - Set whether a scale should be displayed at the edges of the editor.
- Display Mode - Select whether the editor should be displayed as
Endless(=borderless mode) orPage(=like single pages). - Active Snaplines - When a shape is moved on the canvas, it orientates itself to already existing ones. This happens in the form of so-called snap lines, with which a shape snaps briefly when it is on a line with another. Here, too, you have the choice to enable or disable them.
- Navigator Visible - Choose whether a pictographic overview of the entire Process Map should be displayed in the lower-left corner of the editor.
- Show Sections on Color Palettes - Since M-Files Process Maps version 2.0, it is possible to include the colors of your vault, configured via the Theme Editor, directly into the Process Maps color palette. With this option, you can choose if this extension of the color palette should be accessible.
- Allow Panning (Viewer) - Select whether a user can freely move the selected map within the preview.
- Allow Selection (Viewer) - Select whether a user can click on individual elements within the preview and thus highlight them.
- Show Toolbar (Viewer) - Determine if the Toolbar is accessible within the preview (see Map Preview).
- Zooming Ratio (Viewer) - Decide whether the default Zooming Ratio of the preview should be based on the entire content of the map (Fit), the Width or the Height of the map. In addition, this can also be set to 100% (see Map Preview).
- Loading Indicator Color - Set the background color of the loading animation that is displayed when jumping from one map to another.
- Loading Indicator Highlight Color - Set the color of the loading animation itself, which is displayed when you jump from one map to another.
3. Map - Set how elements that interact directly with M-Files (e.g., commands and M-Files objects) are displayed.
- MF-Icons Visible - Specify whether M-Files objects that are brought onto the map should display an icon.
- MF-Icons Size (mm) -Specify the size of M-Files icons in millimeters.
- Commands Visible - Determine whether command icons should be visible.
- Command Size (pt) - Set the font size in which command icons should be displayed.
- Command Execution Indicator - Set whether a visual feedback (loading circle) should indicate the execution of a command.
- Command Indicator Timeout (ms) - If the execution of a command takes longer than the time defined here, a timeout occurs.
- Indicate Execution Error - Determine if the user should be informed that a timeout has happened.
- Preferred Font - Select from a list of numerous fonts which one should be used as default in your editor.
4. Smart Node - Change the default appearance of Smart Nodes.
- Background Color - Set the background color of all newly applied Smart Nodes.
- Corners Rounding - Set the curvature of the corners of a Smart Node.
Relations
1. Edit Allowed For - Determine which user group is able to change those settings in the Save and Configure dialog of the editor. By default, all internal users have access to this section. 2. Create and Maintain - Specify whether, by default, process maps establish and maintain relationships with linked M-Files objects.
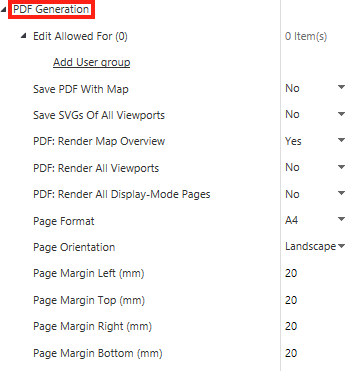
PDF Generation
- Edit Allowed For - Determine which user group is able to change those settings in the Save and Configure dialog of the editor. By default, all internal users can access this section.
- Save PDF With Map - Determine if a PDF file should be saved together with the Process Map.
- Save SVGs Of All Viewports - Decide whether an SVG file should be rendered from each viewport of a Process Map.
- PDF: Render Map Overview - Determine whether an overview of the whole map should be rendered as a PDF when saving a Process Map.
- PDF: Render All Viewports - Decide if PDF files should be saved from all its viewports when saving a Process Map.
- PDF: Render All Display Mode Pages - Besides the possibility to display an editor in endless mode, the map can also be displayed on multiple pages. With this item you decide whether these pages should be saved as a PDF file.
- Page Format - Set the format of the individual pages of the PDF on which the Process Map will be rendered. You can choose from
A5toA0. You can also selectUS Letter,US LegalandUS Ledger. - Page Orientation - Specify whether the PDF should be rendered in
Landscape(=horizontal) orPortrait(=vertical) aspect ratio. - Page Margin Left / Top / Right / Bottom (mm) - Define the page margin towards any direction.
Association
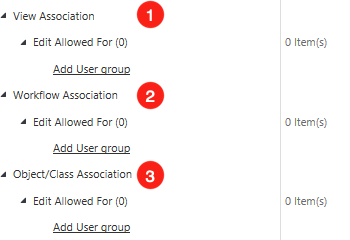
This section deals with three main categories. However, since they are very similar, they will be treated together.
1. View Association
- Edit Allowed For - Define which user group is allowed to associate Process Maps with M-Files Views in the Save and Configure dialog. By default, users with
Full control of vaultorManage common views and notification rulesrights can access this function.
2. Workflow Association
- Edit Allowed For - Select which user group is able to associate Process Maps with workflows in the Save and Configure dialog. By default, users with
Full control of vaultorManage workflowsrights can access this function.
3. Object/Class Association
- Edit Allowed For - Determine which user group can associate Process Maps with objects or classes in the Save and Configure dialog. By default, users with
Full control of vaultorManage common views and notification rulesrights can access this function.
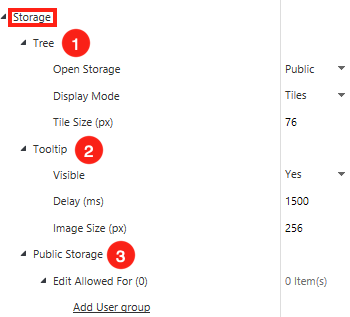
Storage
1. Tree - Make changes to the appearance of the Storage tab.
- Open Storage - Specify here which Storage Tab should be invoked by default when opened by a user. Choose between
PublicandPersonal. - Display Mode - Set whether the contents of the storage should be displayed as
Tile(=image of the element), or asNames(=only the name of the element). - Tile Size (px) - If you have selected
Tileas the display format in the previous option, you can specify its size here.
2. Tooltip - When you hover your mouse over an element, a tooltip with an enlarged image and the name of the element can appear. You can make settings for this here.
- Visible - Set whether a tooltip should appear.
- Delay (ms) - Set how many milliseconds the mouse pointer must be over an element for a tooltip to appear.
- Image Size (px) - Set the size of the tooltip.
3. Public Storage
- Edit Allowed For - Specify which user groups are allowed to edit the Public Storage. By default, only server and vault administrators can access this function.
Color Palettes
Since M-Files Process Maps version 2.0 it is possible to create your own colors for the color palette. In this section, you will learn how to use the full potential of this new feature.
1. MF-Colors - By default, a color palette is displayed here that uses the colors you chose in the Theme Editor of your vault. So you have access to the colors of your corporate design right from the beginning.
2. Colors - In this section, you will find the individual colors of a palette.
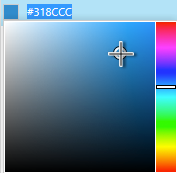
3. Editing a Color - When you expand a specific color, you can also change the name as well as the color tone. You can change the shade either by entering a hex code or by using a color editor. If you want to delete a color from your palette, click on the - button.
4. Add MapPaletteColor - Click here to add a new color to an existing palette.
5. Add MapColorPaletteConfiguration - If you want to create a completely new color palette, click here.
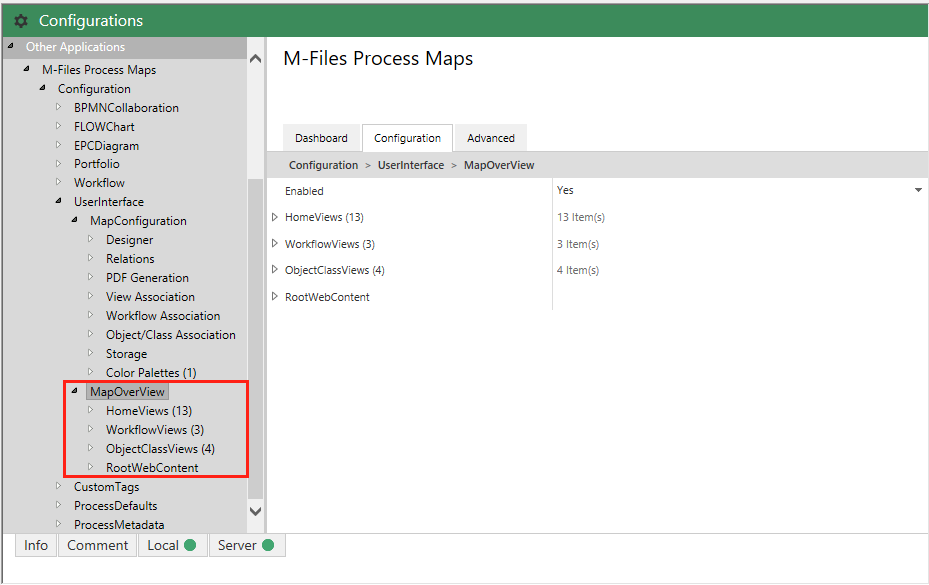
MapOverView
- This section is about linking Process Maps with various elements and contexts of your M-Files client. There are a number of cases in which it makes a lot of sense to display Process Maps as additions. Just think of the possibilities to provide your users with cheatsheets and guidelines while they navigate through your M-Files Vault. You can link Process Maps to M-Files views, specific workflow steps, and even object classes.
- Using the
Enabledflag, which can be found at the top of the list, you can centrally manage whether Home Maps, Work Step Maps, Object Class Tabs or Web Content should be displayed in your Vault. By selectingNo, none of the above will be displayed.
HomeViews
The following functions are configurations that were used for direct setting up to M-Files Process Maps version 1.7. The configuration is now directly integrated in the Designer (see Save & Configure). Therefore, please use the settings with caution. A double assignment of ViewPath or ViewID via Save&Configure and M-Files Admin interface leads to errors in the display.
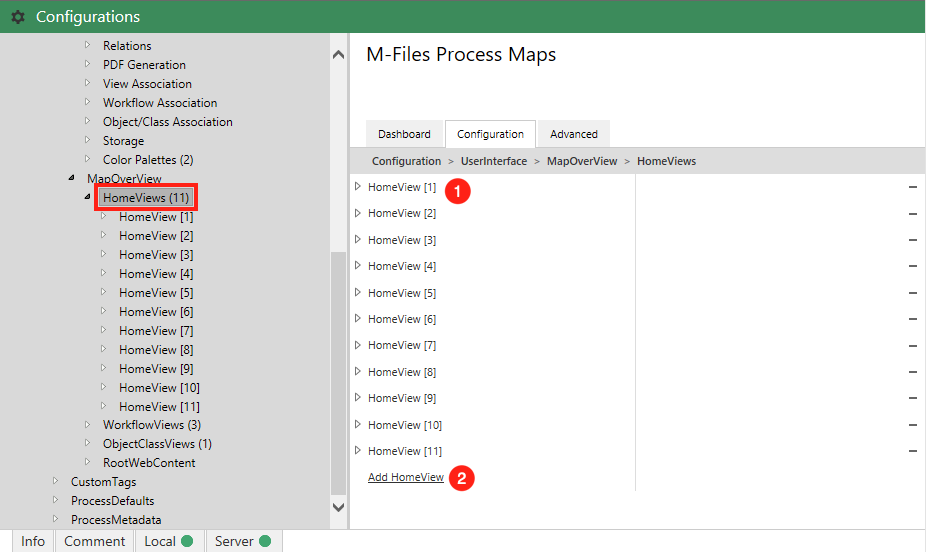
Via the HomeViews section, you can associate M-Files views of your vault with process maps. This helps your users to better understand the contents of views and supports them in navigation.
- When the
HomeViewsnode is expanded, you will get a list of all the HomeViews created so far. - To add a new one, you have to click on the
Add HomeViewentry.
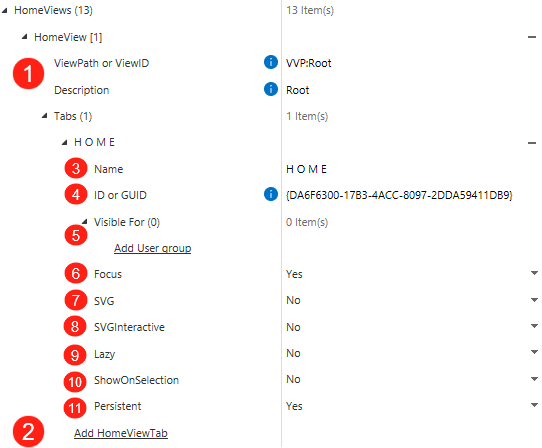
After clicking the Add HomeView button you will get these options to create a new HomeView.
- ViewPath or ViewID - Enter here the
ViewPathor theViewIDof the view you want to link a Process Map to. - Add HomeViewTab - After we have defined the View with the previous point, we will now determine the Process Map for it. For this, we have to expand the
Tabsnode and click on the buttonAdd HomeViewTab. - Name - Set the name that will be displayed in M-Files Client as the tab name.
- ID or GUID - Enter the
IDorGUIDof the Process Map you want to use as HomeTab. - Visible For - Specify which User Groups should be allowed to see this specific HomeTab. This feature can be used to show different start pages to employees of different branches.
- Focus - Decide whether the tab with the linked map should be displayed immediately when the view is accessed.
- SVG - Here you can choose whether the HomeTab should be rendered as a static SVG (
Yes) or with its full interactive potential (No). Please Note: By not making the map interactive, you can get a huge increase in performance. - SVGInteractive - If you have decided to use a HomeTab in SVG format, you can set here whether the user can unlock the full interactive functionalities of the Process Map independently via a button in the HomeViewTab.
- Lazy - You can also let your HomeViewTab load lazy. This means that the map is only loaded when it actually needs to be displayed. This way a big gain in performance can be achieved as well.
- ShowOnSelection - Activate this option to display the map when a view in the client is simply selected and not yet open.
- Persistent - Enable this item to display the map beyond its actual tab. If you activate this for a map assigned to the root view, it will be displayed as a static tab in every view of your M-Files Vault. For example, you can establish a central navigation menu or a process house that is always accessible by the user. If you assign the map to a specific view, this option will cause it to be displayed in all sub-views/virtual folders below it.
You should also note:
- If you link a view using the
ViewPath, you must pay attention to the exact spelling that was used when creating the view. otherwise you will not be successful with the link. - It is also possible to store several tabs for a view if e.g. you split your process map into several parts to make them faster selectable in the tab bar in your M-Files Client. The focus is always set to the first map that you have added as a tab here, regardless if you also select ´yes` to focus on the other tab.
- Test the stored settings by starting an M-Files client after you have logged in again. Of course, the normal authorization rules of M-Files objects apply here, so make sure that your users have the necessary rights to have the process maps displayed at all.
Setting Up HomeViews for Virtual Folders
At this point, we have only looked at setting up HomeViews for static M-Files Views. However, if HomeViews are to be displayed along with virtual folders, there are a few things that should be kept in mind. Since virtual folders are created dynamically using object or document metadata, they provide further possibilities to interact with them.
However, let's first examine what the configuration looks like when a HomeView is displayed alongside a single virtual folder. In this example, a HomeView has been assigned to a virtual folder via the Save and Configure dialog.
- The first part refers to the path of the static M-Files View in which the virtual folder is located.
- The second part specifies the data type by which the objects of the view are sorted into virtual folders.
- The third part indicates for which virtual folder the HomeView is displayed. Again, since in this case we have assigned a HomeView to only one virtual folder, a unique path is also displayed here.
However, the configuration can be further customized to make even better use of the virtual folder characteristics.
If you replace the path of the virtual folder (the third part in our example) with a * , the HomeView will no longer be displayed only in a single virtual folder. Instead, the HomeView will be displayed for all virtual folders that are in the parent view and refer to the given data type. in this case the * acts as a wildcard for the specified datatype. This has the effect of displaying the HomeView for all current, as well as future created virtual folders.
WorkflowViews
The following functions are configurations that were used for direct setting up to M-Files Process Maps version 1.7. The configuration is now directly integrated in the Designer (see Save & Configure). Therefore, please use the settings with caution. A double assignment of WorkflowID and StateID via Save&Configure and M-Files Admin interface leads to errors in the display.
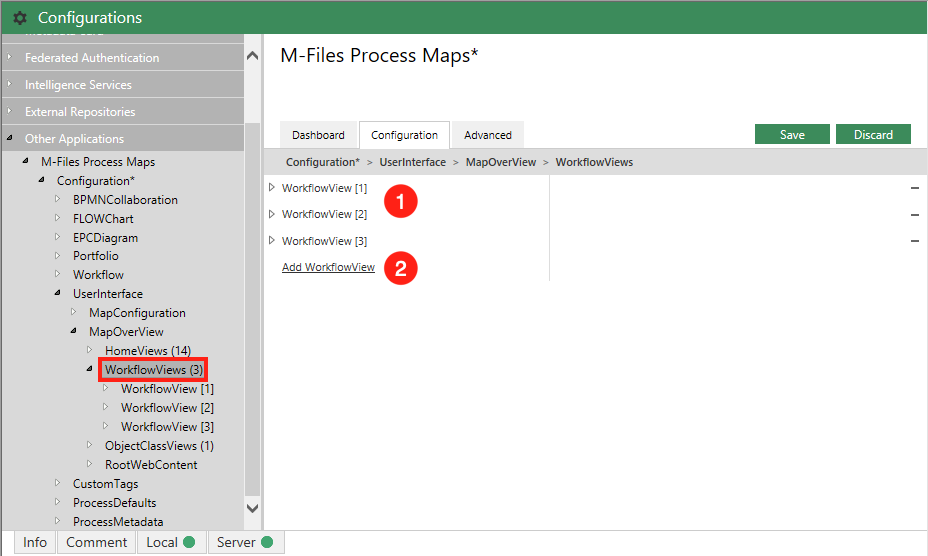
With Workflow Tabs, you can display a process map depending on the status of an object selected in the M-Files client, for example, to offer additional information or overviews that are not required in another process status.
- When the
WorkflowViewsnode is expanded, you will get a list of all the WorkflowViews created so far. - To add a new one, you have to click on the
Add WorkflowViewentry.
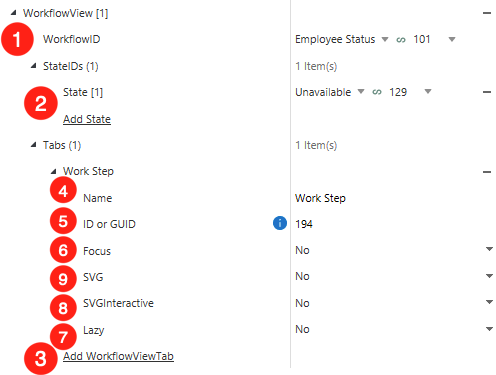
After clicking the Add WorkflowView button you will get these options to create a new WorkflowView.
- WorkflowID - Use a drop-down list to select which workflow should be referenced.
- State - To get this option, you need to unfold the
StateIDsnode. If you click onAdd Stateyou will get a list of all workflow states of the previously selected workflow. Select the state you want to add a Process Map to. - Add WorkflowViewTab - After we have defined the Workflow state with the previous item, we will now determine the corresponding Process Map for it. For this, we have to expand the
Tabsnode and click on the buttonAdd WorkflowViewTab. - Name - Set the name that will be displayed in the M-Files Client as the tab name.
- ID or GUID - Enter the ID or GUID of the Process Map you want to use as a WorkflowViewTab.
- Focus - Decide whether the tab with the linked map should be displayed immediately when the object in the set Workflow state is selected.
- SVG - Here you can choose whether the HomeTab should be rendered as a static SVG (
Yes) or with its full interactive potential (No). Please Note: By not making the map interactive, you can get a huge increase in performance. - SVGInteractive - If you have decided to use a HomeTab in SVG format, you can set here whether the user can unlock the full interactive functionalities of the Process Map independently via a button in the WorkflowViewTab.
- Lazy - You can also let your WorkflowViewTab load lazy. This means that the map is only loaded when it actually needs to be displayed. This way a big gain in performance can be achieved as well.
ObjectClassViews
The following functions are configurations that are also directly integrated in the Designer (see Save & Configure). Therefore, please use the settings with caution. A double assignment via Save&Configure and M-Files Admin interface leads to errors in the display.
The ObjectClassViews section allows you to bind the display of maps to specific object classes. Think of this as class-related guides or descriptions for the usage of a special class and its meta data.
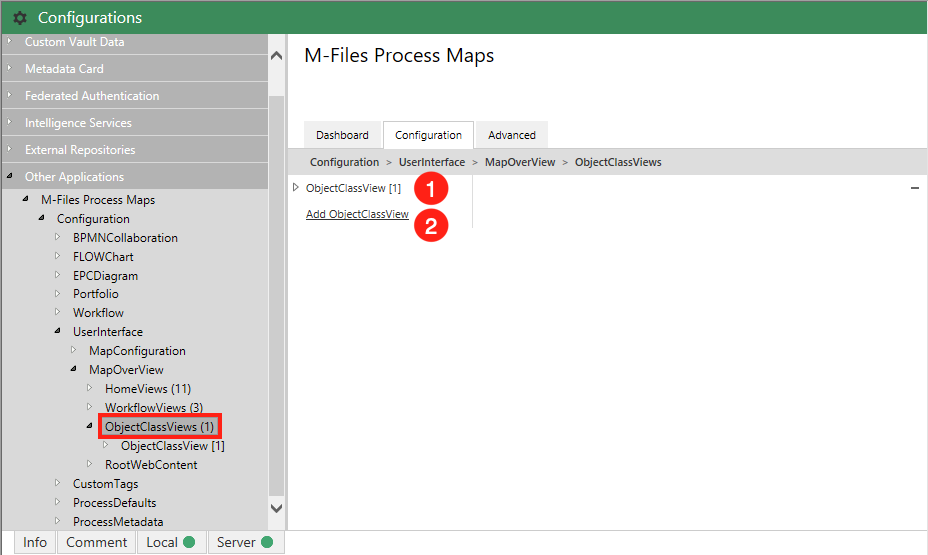
- When the
ObjectClassViewnode is expanded, you will get a list of all the ObjectClassViews created so far. - To add a new one, you have to click on the
Add ObjectClassViewentry.
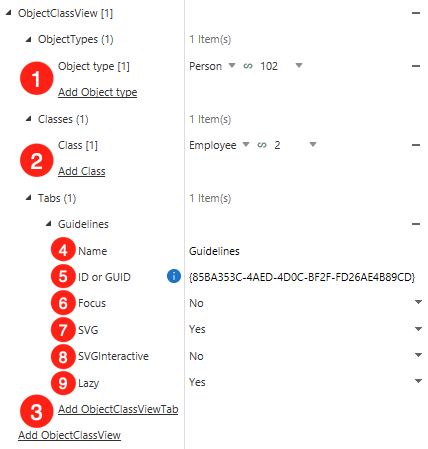
After clicking the Add ObjectClassView button you will receive these options to create a new ObjectClassView.
- ObjectTypes - Select from a dropdown list the object type you want to associate with a Process Map.
- Classes - Here you can select a specific object class that should receive a Process Map.
- Add ObjectClassViewTab - - After we have defined the specific object class with the previous item, we will now determine the Process Map for it. For this, we have to expand the
Tabsnode and click on the buttonAdd ObjectClassViewTab. - Name - Set the name that will be displayed in M-Files Client as the tab name.
- ID or GUID - Enter the
IDorGUIDof the Process Map you want to use as an ObjectClassViewTab. - Focus - Decide whether the tab with the linked map should be displayed immediately when the view is accessed.
- SVG - Here you can choose whether the ObjectClassViewTab should be rendered as a static SVG (Yes) or with its full interactive potential (No). Please Note: By not making the map interactive, you can get a huge increase in performance.
- SVGInteractive - If you have decided to use the SVG format, you can set here whether the user can unlock the full interactive functionalities of the Process Map independently via a button.
- Lazy - You can also let your ObjectClassViewTab load lazy. This means that the map is only loaded when it actually needs to be displayed. This way a big gain in performance can be achieved as well.
RootWebContent
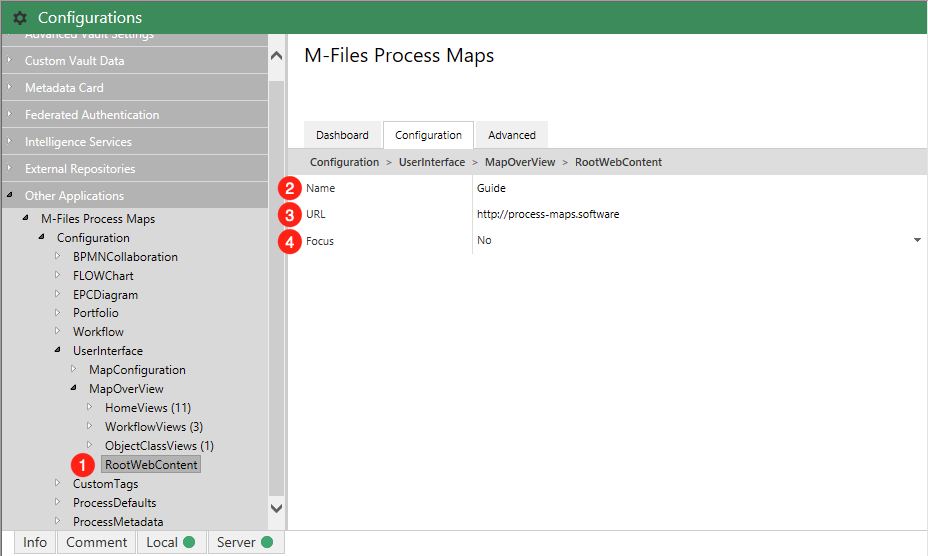
You can also display a web or intranet page as a tab on the home screen. All you need is the URL:
- Select the RootWebContent node.
- The name of the tab can be entered and will be displayed later in the M-Files client.
- You can specify a static URL that leads directly to the desired webpage.
- If you select Focus, the tab is focused right away and displays the selected page when you are on the Home screen.
